Sunday 29 July 2007

Kai Choy and Roast Duck Stew

Back at home, mom and other relatives would always make this dish whenever we have leftovers of roast meat, particularly duck meat, roast pork etc. This 'leftover' situation occurs more often than not around some celebrations like Chinese New Years, Birthdays and so on. So what they usually do is that they just throw in all the leftover meats into a pot, add in Kai Choy and some other spices and make a delicious stew out of it for the next day. Having said that, this dish is not at all 'rugged' or 'low-class' so to speak. As the matter of fact, everybody likes the dish, and one might most probably find this stew in some chicken, duck, or some roast meat specialty shops.

Now, since I am here in Australia, the luxury of eating roast duck and other meats does not occur that often, and many thanks to Ham who shout us a roast duck one night after he won some cash from Star City, that we had some leftovers of various parts of a duck. From there, I suggested to make this dish. Hopefully everyone who tries this dish likes it...


Ingredients: (serves 5-6 person)

Leftovers from a Roast Duck (about 300g)
3 bunch Kai Choy
1/2 cup Dried Chili (soaked and seeded)
3 cloves Garlic (finely chopped)
1 tbsp Vegetable Oil
3 tbsp Tamarind paste (or 3pc Tamarind slices)
Water

The ingredients for this dish is actually fairly subjective according to people, you could use juicy and succulent duck meat or roast pork, or if you feel like it, just mix up any roasted meat you have. The amount of the meat is also not fixed, add more if you like more meat in the stew. The actual recipe used tamarind slices, I used the paste form as I could not find it around the area, but it's as good I reckon.


Method:

1. Heat oil in a pot and add chopped garlic and dried chili to stir-fry until aromatic. Beware of the spiciness of the dried chili at this moment.

2. Add in pre-soaked Kai Choy, stir fry for about 5 minutes before adding the duck meat. Cover with water slightly over the ingredients level.

3. Add in the tamarind paste, turn to low heat, cover with lid and stew for about 20-40 minutes. Add seasoning according to taste if necessary. Done. Serve hot.


Honey & Peanut Sauce Chicken

Ingredients: (serves 1)

Chicken Thigh Fillet
1pc Chicken Thigh Fillet
1 tbsp Honey
1 tbsp Crunchy Peanut Butter
1 tbsp Brown Sugar
1 tbsp Butter
2 tbsp Chinese ShaoXing Wine
1 tsp Dark Soy Sauce
1 tsp Sea Salt
1 tsp Light Soy Sauce
1 tsp Black Pepper Powder
1 tsp Lemon Juice
1 stem of Rosemarry (take the leafs only)

Asparagus
6 sticks Asparagus
1 tbsp Chinese ShaoXing Wine
1 tbsp Butter
Pinch of Salt, Sugar and Pepper

Method:
1. Marinade the chicken thigh fillet with all the ingredients, leaving the butter.
2. In a pan (preferably non-stick), melt the butter and slowly saute the fillet over medium-low heat, this should take about 10-15 minutes.
3. In a flat pan, melt butter and saute the asparagus over low heat, tossing occasionally. Add the leftovers of the marinate if available, season to taste.
4. Add the wine at last before removing from heat, toss a few times. Done

Friday 27 July 2007

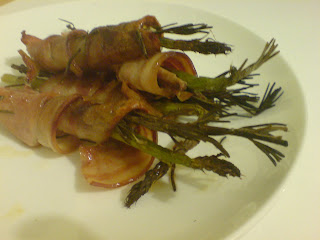
Rosemarry Bacon Wraps

I once saw Jamie Oliver made this recipe in one of his many cookery series, and wanted to try it out for a long time, and I finally did. It is probably not as good as the one by Jamie, as I could remember bits and pieces of it. Having said that, this recipe probably is not 100% similar to that of Jamie's as well, I made it depending on some rough ideas on the one I saw before.

Ingredients: (serves 4)
4 stick of Asparagus
4 stem of Rosemarry
4 pc Bacon Strip
2 tbsp Olive Oil
5 tbsp Red Wine
Pinch of Pepper and Sugar

Method:
1. Hold the asparagus and rosemarry together, wrap around with bacon. Hold bacon in place with toothpick if necessary. Repeat with remaining ingredients.
2. On a baking tray, place the wrap lying flat, add seasoning to taste and sprinkle with olive oil and wine.
3. Bake in preheated oven for 20-30 minutes at about 200 degrees Celcius. Done.

Suggestion: Should only eat one at one time, as it is quite high in Cholestrol, given the bacon used. If possible, opt for untreated bacon and add Italian Achovies Fillet for the saltiness. Serve with a simple salad to compliment the strong flavour of the wraps.

Tuesday 24 July 2007

First Day of Uni...Scones Day!

It's was first day of the new session and I was in the mood of making something different...and easy! HaHa... well considering the ingredients I had in the kitchen and the tight budget that I am living on for the coming week (thanks to the fact that I spent a lot on the holiday trips), I decided to make some all time favourites - scones!

Well, there are plenty of scone recipes around, mine is nothing too special to brag about, but I'll jot it down anyway. But what I was happy with was the aromatic smell that filled the house when I was baking, it's the best scent a house can ever smell. People should quit buying synthetic air fresheners and just bake everyday so that their house smell good. That way, we can kill two birds with one stone, namely, having a house which smells good, and most importantly, have a gastronomic feast everyday! What else could be better! HaHa....

Anyway, check out the recipe, I refered to a few recipes together to make this, it's simple after a few times making it, I reckon I do not need to refer to a recipe the next time I bake them again... XD


Ingredients: (makes 9 uneven pieces)

2 cups Self-raising Flour

2/3 cup Brown Sugar (adjust to suit own preference)

2 tsp Cinnamon Powder

1/2 cup Butter or margarine

2/3 cup Milk

1 beaten Egg

1 tsp Vanilla Extract

1 cup Raisins or Sultanas (add more if you want!)

Extra Milk and Brown Sugar for crust

Method:

1. Heat oven to 200 degrees Celsius.

2. Sieve and combine self-raising flour, brown sugar and cinnamon powder.

3. Cut in butter until mixture resembles coarse crumbs. If you feel that it is too much a hassle, just melt the butter, add in the flour mixture, then mix well.

4. In another bowl, combine milk, egg and vanilla essence. Add to flour mixture; stir until dry ingredients are moistened. Stir in raisins (Slightly rinse them a while beforehand, drain water before use).

5. With floured hands, shape dough into about 5cm portions (should be able to make 9 piece) on greased baking plate or pan. Brush each scone top with milk and sprinkle a bit of sugar prior to baking (for a nice crusted glaze)

6. Bake at 200 degrees Celsius for 15 to 20 minutes. Serve warm (I like to eat with some fruit conserve and yogurt).

There you go! It is not too hard I reckon, simple and sweet. Enjoy!

Monday 23 July 2007

Mushrooms and Celery Salad

I made this salad the night before I went to Snowy Mountains, despite running low on supplies, I forked out this dish with available ingredients in the fridge. Thank God. HaHa...


Ingredients: (serves 1)
4 sticks Celery (seperate the leafs and the stem, chop coarsely)
100g White Button Mushroom (thinly sliced)
25g Black Woody Fungus (finely chopped)
2 cloves Garlic (finely chopped)
2 tbsp Vegetable Oil
1 tbsp Dark Soy Sauce
1 tbsp Light Sauce
1 tbsp Brown Sugar
2 tsp Salt
1 tsp Chinese Shao Xing Wine

Method:
1. In a bowl, mix the celery with 1 tsp salt, leave aside.
2. In a heated pan or wok, stir-fry the sliced mushrooms and fungus without oil, add brown sugar to caramalize, now add oil and chopped garlic, stir-fry for a couple minutes before adding the rest of seasoning. Done.
3. Mix well with the celery. Serve hot or cold.

Basil Chicken with CharSiew & Orange Sauce

I actually learnt this dish from Derrick and improvised it a bit to suit my own taste. If you are looking for the original recipe, simply visit Lee Kum Kee's official website. They offer a lot of recipes there, but mostly using their own sauces. But anyway, back to my own version, I added some spiciness to it, particularly to suit my own preference and to add another taste to the flavour of the whole, check it out...


Ingredient: (serves 1)

2 pc Chicken Thigh Fillet

1 orange (peel and teared not cut, zested)

2 bunch Sweet Basil (rinsed and cleaned)

2 tbsp Hot Paprika Powder

2 tbsp Char Siew Sauce

5 tbsp Orange Juice

1 tsp Orange Zest

6 petals Chinese Cabbage

2 cloves Garlic

1 tbsp Light Soy Sauce

1 tbsp Vegetable Oil


Method:

1. Marinade the chicken fillets for at least 1 hour with the hot paprika, char siew sauce and orange juice.

2. On a plate, spread the chicken thigh fillet, place on top 1 bunch of basil leafs, 1/2 tsp of orange zest and 2 pieces of orange, wrap the chicken around the ingredients, tie with kitchen string. Repeat the same steps for another piece of fillet.

3. Place the wrapped chicken thigh fillets in preheated oven and roast for 20 minutes at 200 degrees Celsius. Take out, turn the fillets to another side and roast for another 20 minutes. Remember to include all the marinate sauce and the remaining oranges when roasting.

4. Meanwhile, heat oil in a pan, crush the garlic, add in and stir fry with the Chinese cabbage, add light soy sauce, just to give it some taste.

5. On a plate, place the Chinese cabbages, place the roasted chicken thigh fillets on top and pour on top the remaining sauce. Done. Serve hot.

Back From Trip, Derrick Rushing for the Lotus Roots

Hello everyone! I just came back from a couple of days trip in a few places, namely Wollonggong, Snowy Mountains and Blue Mountains and all of them was fantastic, went to heaps of places and ate some really good food as well. However, just as much as I would like to write about the trips, Derrick has been pushing me to write about a dish I made over dinner a few days before I took off for the trips. So, here you are, Derrick, hopefully you find it useful this Thursday...


Ingredients

375g Prepacked Lotus Root Slices
100g Fried Gluten (soaked in water until soft)
1/2 Carrot (Finely sliced) [use 1pc if using small carrots]
25g Black Woody Fungus (fienly chopped)
1/2 Red Spanish Onion (finely chopped)
2pc Kaffir Lime Leafs (finely chopped)
2 cloves Garlic (finely chopped)
2 tbsp Light Soy Sauce
1 tbsp Dark Soy Sauce
2 tbsp Vegetable Oil
1 tbsp Soy Paste
1 tbsp Spicy Soy Paste
250g Minced Pork
1 tbsp Sugar
1 tsp Black Pepper


Method

1. Rinse the lotus root slices and fried gluten, place on plate and steam until soft.
2. Heat oil, stir in chopped garlic and onion, fry until aromatic, followed by black woddy fungus and then the minced pork.
3. Stir in all the seasonings and stir fry until the meat are cooked thoroughly before adding the kaffir lime leafs, continue to stir the ingredients for a couple more minutes. Done.
4. Place on top of the steamed gluten and lotus root slices. Serve hot.

I actually improvised the usual way of frying minced pork to that of a more Thai-style one. This dish was in fact inspired by a dish that I had back in the Monastery at Boondanoon. I reckon those Winter Retreat participants must have tried the fry mince pork that the monastery's kitchen served us at our arrival day. Hence, if you try this dish, you might find certain relavance to Thai dishes, and I would not hesitate to tell you that Yes, it is imporvised from a Thai style dish. To end, let us pray for the happiness of mankind... Sadhu Sadhu Sadhu...


Sunday 15 July 2007

Celery & Tuna Salad with Peanut Sauce


Ingredients:
1/2 Bunch Celery
250g Tuna Flakes
100g Raw Peanuts (toasted, skin removed and crushed)
3 cloves Garlic
3 tbsp Vegetable Oil
2 tbsp Crunchy Peanut Butter
1 tbsp English Mustard
2 tbsp Black Pepper
2 tbsp Sea Salt
1 tbsp Brown Sugar
1 tbsp Light Soy Sauce
1/2 cup water

Method:
1. Rinse the celery, coarsely chop the celery, add 1 tsp salt and mix well.
2. In a small wok, heat the tuna flakes, add light soy sauce, 1 tbsp sea salt and 1 tbsp black pepper, saute for a couple of minutes and place on top of celery.
3. In a sauce pan, heat vegetable oil, add crushed garlic, followed by toasted crush peanuts, peanut butter and english mustard. Saute for 2 minutes before adding water and the rest of the seasoning. Done. Pour over tuna and celery. Preferably serve hot.

Hakka VegePot

This dish was inherited from my grandmother and my mom, both of them use to make this dish during special occasions and celebrations like first day of Chinese New Year, first and 15th day of the Chinese lunar calender etc. As usual, I made this dish on the last 15th day of the Chinese lunar calender i.e. yesterday...HaHa check the recipe out, it's simple and nice, usually my family will just eat the pot of vege for the whole meal, rice and other extra dish would be just to compliment this dish... hopefully everyone likes it...

Ingredients:
2 pc Chinese Fermented Bean Curd
10 petals Chinese Cabbage
10 petals Cabbage
50g Fried Gluten
80g Black Woody Fungus
80g Chinese Shitake Mushroom
100g Bean Curd Sticks
100g Bean Curd Skin
200g Glass Noodle
250g Deep Fried Tofu Puff
2 tbsp Salt
3 tbsp Brown Sugar
5 tbsp Vegetable Oil

Method:
1. Soak bean curd sticks, bean curd skin and fried gluten in hot water until soft. Soak mushroom and woody fungus in cold water for a few hours.
2. In a pot, fry the sliced Chinese mushroom and woody fungus without oil, add 1 tbsp of brown sugar and stir-fry for another 1 minute before adding vegetable oil.
3. Add in the Chinese cabbage and cabbage, stir-fry for another 5 minutes before adding the bean curd puffs, bean curd skin, bean curd sticks and fried gluten. Add water to cover the ingredients, bring to boil and add the fermented bean curd, turn to low heat, cover with lid and braise for 30-45 minutes.
4. Remove lid, add in pre-soaked glass noodles, mix well, add seasoning, cover with lid and braise for another 10-15 minutes over low heat. Done.

Friday 13 July 2007

Steamed Eggplant with Vinegar and Sesame Sauce


I was invited to cook again at my mates place, and I just bought some fresh eggplants from the market today. Hence, I wanted to make something simple and nice, which brings out the freshness of the eggplant itself, unlike the previous eggplant dish which was heavy in flovour and taste. This one is simple to make and it really tastes good! (as quoted from my mates)...

Ingredients:
8 long and small Eggplants (about 500g)
3 small spicy Chilli (fine chopped)
5 cloves Garlic (coarsely chopped into cubes/chunks)
50g sesame Seeds (toasted)
1 tbsp Light Soy Sauce
3 tbsp Vegetable Oil
5 tbsp Dark Vinegar
2 tsp Sugar
2 tsp Pepper
1 tsp Salt


Method:
1. Cut the eggplants into big chunks, leaving certain parts connected, maintaining the orignal shape. Steam for about 15 minutes, or until soft.
2. Heat oil in wok, saute garlic until golden brown and crispy, set aside.
3. In the same wok, add chopped chili and vinegar, followed by the other ingredients.
4. Pour over steamed eggplant, add garlic chunks on top and sprinkle generously with toated sesame seeds. Done.

Strong Waves...Prelude to Hurricane

Everyone has been talking about this place and I was thinking "Gosh I've got to go and try it this holiday", and I did! Finally got to taste the pork rib that a lot people were talking about! It was quite an effort to get everyone to get together as everyone was busy with their own plans and stuff, but yeah, we finally went there! I personally placed the reservation a day before we went there and I was wondering what makes this place so famous that it can be fully booked for the whole day? Luckily there was an empty slot before 7.30pm for that day and me and my mates could go for that... The point is, the place is really famous! and it was crowded within 30 minutes of operation, we know that as we were the first table of customers that day, and we saw how the crowd fill in the tables so fast, that you wouldn't believe it, and even when we left, people were continuously flocking to the restaurant, Gosh, thank God I placed a reservation...

Anyway, as mentioned in the title, we (well, Derrick and me for that matter) witnessed the strong waves at Bondi Beach that day right before we went to the restaurant. We were there early as we were looking for vacant jobs at Bondi Junction, which we then thought of going to the beach earlier, as I never went there before. Anyway, good experience! The strong wind was hustling and pushing the waves relatively strong that day, my hair was all blown up...HaHa. I've got to come back to the beach during summer or something, as this place is famous for sunbathing and other beach activities, so it would be pretty much a guys heaven I reckon (oops, I meant beach lovers) HaHaHa...


As you could see, the restaurant was pretty empty when we got there, without the crowd and people, the interior design is pretty good I reckon. Ofcourse, when people come into the picture, it shows another face of the place, the livelihood of it, how people from various places are brought together just because of one thing, GOOD FOOD! HaHa

Alritey, here is what we came for, the ribs, the full rack, looks good huh? sorry to vegans, this is quite vulgar, there really isn't much we could do... The taste was really special, I reckon they have Rosemary, Honey, BBQ sauce and more...hmmm... It would really make a big difference if there was some green veggies or salad to compliment it...but other than that, THUMBS UP!


Sorry again to Vegans! Check out the ribs! I wonder what they do with all the bones? I reckon that each table in the restaurant ordered at least one plate of the ribs (most had 2 to 4). Each full rack comes with about 24 ribs? that makes up to more that 1000 rib bones per night! What do they do with it?! Is there enough dogs in the area to consume all the bones? Hmm I reckon they just dump it at some large dump site... HaHa


Thanks heaps to the lovely waitress, HaHaHa... It's San Rou and Ham at the far end. They ordered grill chicken and lamp respectively. Ham was busy eating the whole night and didn't get to speak much. Probably it's too tasty I guess? HaHaHa...

Leaving the place, people still queing to get their hands on their very one ribs. I guess it's worthwhile the wait...

Monday 9 July 2007

Bacon and Celery Salad

Again another dish I made before I left for Winter Retreat during a random occasion when John and Ham came over to share dinner. They had this half bunch of celery that was sitting in their fridge for some time and had no idea how to cook it. Well, luckily they came over...


Ingredients:

1/2 bunch celery

1/2 red onion

3 strips bacon (sliced thinly, or diced)

3 cloves garlic (fine chopped)

4 petals Chinese Shitake Mushroom (sliced thinly, or diced)

1/2 tbsp lemon juice

1/2 tbsp dried basil

1 tbsp crush dried chili

1 tbsp oregano

1 tbsp black pepper powder

1 tbsp sea salt

1 tbsp brown sugar

2 tbsp olive oil


Method:

1. Rinse and chop the celery according to own preference of size and shape. Sprinkle with sea salt, mix well, leave aside.

2. Preheat oven to 200 degrees Celcius. In a bowl, mix bacon, onion, garlic, mushroom, sugar, lemon juice, basil, oregano and 1 tbsp of olive oil. Place in oven and bake for 20-30 minutes or until the bacon turns brown, take out and mix once in between.

3. Place celery on a plate, top with the bacon and mushroom mix, sprinkle over with crush dried chili and 1 tbsp of olive oil. Done, serve hot or cold.

Thick Mung Bean & Barley Tong Sui

Again this was done before I left for the Winter Retreat. I was feeling unwell and thought that it would be good if I cooked something that would help to improve the nausea. Hence I came out with this simple and easy to make soup, I would like to group it into the dessert category as it is sweet, and apart from being good to relieve body heatiness, common cold and body detoxification, it is fairly delicious, which for me is the main reason for making any dish! XD Anyway, I like this type of dessert to be thick and creamy, hence for those who do not fancy this type of food texture, have to vary the cooking method a bit.


Ingredient:
1 cup barley
2 cup mung bean
1 yellow rock sugar
1 tbsp oil


Method:
1. Soak the barley and mung bean for at least one night, drain the water for use.
2. In a pot, heat the barley and mung beans, add water to cover the beans by about 3-5cm, add rock sugar, cover with lid and bring to boil.
3. Remove lid, turn to low heat and stir constantly in one direction, squash the beans using the laddle if possible, repeat for about 5 minutes.
4. Add water if starts to dry off, and close with lid to braise for another 15-20 minutes. Add oil when most beans are squashed, continue stirring, until you get a thick and creamy paste-like texture.
5. Add another round of water, close lid, bring to boil, done. The whole process might take 45 minutes to 1 hour or more. Serve hot.


The House smells like Banana!!!

Hi there! I've just came back from the UNIBUDS winter retreat, it was really a good experience! Through the 3 days trip, I've really learnt a lot about Dhama, made a lot friends, and what else? the food was really good! Haha! Something I was really not expecting at all! But anyway, it was really fun, would be posting more of the details and pictures after I get the pictures from Chris and others! Anyway, at this very moment, I am enjoying every bite of this moist banana cake that I made before I went to winter retreat, I had one piece before that, and it was really delicious! After a couple of days in the fridge, it still tastes not bad! You guys should really try this recipe, I got it from Exclusively Foods (after doing me research on the best recipe) and I would not have agree more with the comments on that website, it is simply aromatic, moist and delicious! I still recalling that very day when I baked the cake and the whole house was filled with this aromatic banana smell! I'd definitely be making this cake again, when I have got heaps of banana, that is XD !!!

Anyway, I changed the recipe a bit according to my preference, for the original one, check it out at Exclusively Food...

This recipe makes a moist, dense banana cake with a smooth cream cheese icing. The cake doesn't rise much so it has a nice flat top for presentation. Unlike Exclusively Food, I decided to add banana slices with melted malt on top of the cake, this gives another soft texture of the banana on top of the dense the cake. Serve the cake at room temperature...

Ingredients:

Cake

2-3 large bananas


125g butter softened (if using unsalted butter add 1/4 teaspoon salt with the flour)


330g (1 1/2 cups) sugar


300g very ripe, mashed banana


1/2 teaspoon vanilla extract(1 teaspoon natural vanilla essence)


2 large eggs (minimum weight of 59g)


100ml (1/3 cup + 1 tablespoon) buttermilk


250g (1 1/2 cups) self-raising flour


1/2 teaspoon bicarbonate of soda


Cream Cheese Icing & Topping

90g cream cheese


45g softened butter


210g (1 2/3 cups) icing sugar


1 1/2 teaspoons lemon juice


2 large bananas (sliced diagonally)


3 tbsp malt


Method:

1. Preheat oven to 160 degrees Celsius fan-forced. If you don't have a fan-forced oven, preheat the oven to 180 degrees Celsius. Grease and line a 22cm diameter spring form pan.Place butter, sugar, banana, vanilla and eggs in a food processor, process for about 2 minutes. Scrape down sides of processor.

2. Add buttermilk and pulse to combine.Sift flour, salt (if using) and bicarbonate of soda together into a large bowl. Add flour mixture to food processor and process until just combined.

3. Pour batter into prepared tin.

>Bake for about 50-60 minutes, or until a skewer or knife inserted in the centre of the cake comes out clean.

Leave cake to cool on a wire rack.Spread cooled cake with cream cheese icing.

4. To make cream cheese icing. beat cream cheese and butter with an electric mixer until creamy. Add sifted icing sugar and beat until smooth. Add lemon juice and beat to combine. Spread icing over top and sides of cooled cake.

5. As for the banana topping, simply slice the bananas diagonally and arrange in a circular array on top of the cake. Melt the malt in hot steam for about 5 minutes or until liquefy, pour on top the cake. Done. To keep longer, store cake in an airtight container in the refrigerator.

Wednesday 4 July 2007

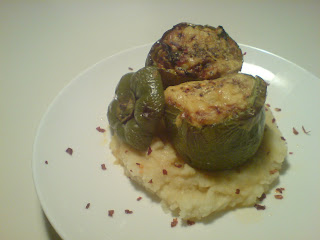
Stuffed Capsicum

Yesterday was really tiring as I was busy making a cake, after that, I was really exhausted and didn't know what to cook for dinner. After browsing through the fridge, I finally decided to use up all the capsicums in the fridge, since they have been sitting there for quite some time. Hmm, I guess sometimes good things (food) just do not require special reasons to take place huh? HAHA. Anyway, check it out, it's simple and nice.


Ingredients:
2 Capsicum (cut open on top)
2 cloves Garlic (fine chopped)
1/2 Carrot (grated)
1/2 Red Onion (diced)
50g Woody Fungus (soaked and finely sliced)
50g Shreded Cheese
150g Diced Tomatoes
200g Tuna Flakes
1 tbsp Dried Basil
1 tbsp Oregano
2 tbsp Olive Oil
3 small Potatoes (or 1 large one)
Salt, Pepper, Sugar, Five Spices powder to taste
Crushed Dried Chili for garnishing


Method:
1. Cook the potato(es) in water until soft and tender. Mash and season with a pinch of five spice powder, salt and pepper.
2. Heat olive oil in a pan, stir in diced onion, chopped garlic and woody fungus, caramelize with a pinch of sugar. Add in tuna flakes, followed by diced tomatoes. Add dried basil and other seasoning to taste. Bring to boil.
3. Cut top of capsicum, remove content and rinse thoroughly with water. Dry the capsicum, rub with some sea salt thoroughly before scooping the ingredients into the center. Top with shredded cheese and oregano.
4. Preheat oven to 200 degrees Celcius, bake stuffed capsicums at 180 degrees Celcius for 15 minutes. Done. Place on top of mashed potato, sprinkle with crushed dry chilli, preferably serve hot.

Monday 2 July 2007

Fusion Tomato Rice

I used a fusion in front of the name of this dish as it uses a Chinese cooking method with very much Italian ingredients, hopefully you will like it...


Ingredients:
1/2 Red Onion
2 Large Tomatoes
3 Chinese Shitake Mushroom
5 cloves Garlic
25g Shredded Cheese
150g Tuna Flakes
75ml Long Grain Rice
1 tbsp Pepper
1 tbsp Dried Basil
1 1/2 tbsp Brown Sugar
2 tbsp Sea Salt
2 tbsp Olive Oil
2 tbsp Tomato Paste


Method:
1. Soak the rice in water beforehand. Dice the mushroom and red onion, fine chop the garlic. Separate the center of the tomatoes and the harder skin layer, dice the skin layer and leave the pulp aside.
2. In a wok, dry toast the mushroom, red onion and garlic, add 1/2 tbsp of sugar to caramelize them before adding olive oil.
3. Stir in the dice tomato and tuna flakes. Add seasoning, followed by the tomato pulp extracted earlier.
4. Stir in the rice, mix well and leave to cook for about 5 minutes before stirring in the shredded cheese. Move everything into a rice cooker, press cook. Done. Serve hot from the rice cooker.

Kai Choy Rice


Ingredients:
1 Bunch Kai Choy
1 Chinese Sausage
5pc Chinese Shitake Mushroom
5pc Dried Salted Fish (anchovy)
25g Dried Shrimp
50g Pork Loin Cutlets
75ml Long grain white rice
1 tbsp Pepper
2 tbsp Vegetable oil
2 tbsp Brown Sugar
2 tbsp Light Soy Sauce
1 tsp Sea Salt
2 cloves Garlic
2 slice Ginger

Method:
1. Soak the rice in a bowl with at least an extra 1cm of water level covering it.
2. Cut the mushroom and Chinese sausage into long strips (or desired shape and size).
3. Toast the dried salted fish in an oven for until crispy brown and aromatic.
4. In a heated wok, add the mushroom, toast for a while before adding 1tbsp of sugar to caramelize them. Add chopped ginger and garlic, stir-fry a while before adding oil. Continue to stir-fry.
5. Add pork cutlets, followed by the kai choy, stir-fry until soft before adding all the seasonings, mix well.
6. Add Chinese sausage, mix well before adding the rice. Stir-fry and mix well. Move everything to a rice cooker or a clay pot.
7. If using rice cooker, do not add extra water, just press cook. Those using clay pot, add some water, but do not cover the rice with it, then cook.
8. Take out from rice cooker when done, crush the toasted dried salted fish and sprinkle on top, mix well and serve hot.